MediSnap Documentation
- Development - ChangelogInstallation
A short guide on howto install MediSnap.0. Example Hardware / Network Setup

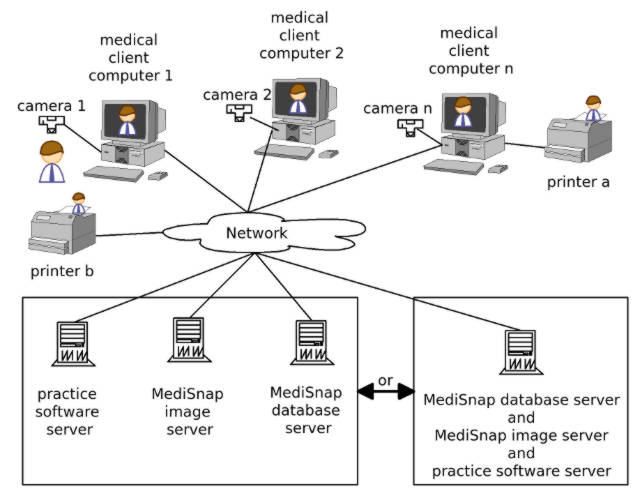
This example setup shows a typical network that has the MediSnap Client Software installed on all medical client computers. The small symbolised men demonstrates that the picture of the man made with camera 1 can be seen on all client computers and can be printed on all printers connected to the network through MediSnap. Of course you don't need so many computers, everything could be on one single computer, even the servers and the client. Also you don't need x cameras, you can just everytime when you want to make a picture connect the camera via USB to the appropriate computer. The detection and camera initialisation usually only takes a few seconds.
1. Image Server
Select a computer where all MediSnap photos will be stored. This computer typically needs lots of disk-space for all the photos. It's also recommended that you have some kind ov backup solution for this so you won't loose any photos when the harddrive crashes. Create a folder (e.g. medisnap-image-server) and make it accessible through your network to all your computers as network-shared drive. Mount this network-drive on all computers where you want to use MediSnap.
2. Database Server
Select a computer as your Database-Server. This can be the same as the image server if you like. Download and Install PostgreSQL on this computer. Setup a database for MediSnap and create the initial table-structure using the file /install/medisnap.sql.
3. MediSnap Client
The following steps need to be done on each computer where you want to use MediSnap. If you wan't to use MediSnap on your Database or Image Server, just follow the steps the same way, there is no real difference here.3.1 Basic Setup
- Download MediSnap and unpack it. Copy the folder
/medisnap-image-filesto your MediSnap Network-Drive on the Image Server. Copy the content of the/clientdirectory to your new client computer (e.g. to /usr/share/medisnap or c:\Programme\MediSnap or c:\programs\MediSnap). - Download Java and install it on you client computer.
- Edit the configuration file
MediSnap.propertieson your client computer to fit your settings. - Run MediSnap by running MediSnap.jar or MediSnap.exe. To start MediSnap into the background at each start of windows, just create a link to MediSnapBackround.exe in your Start/Autostart menu folder. Make sure the working-directory is the same where the file MediSnap.jar is located.
3.2 Integrate MediSnap with your practice software via GDT
This depends on the software you are using, but the basic steps are:- Assign a name to the connection, e.g. MediSnap
- Program to execute should be 'MediSnapStarter.jar gdt' or a simple batch-file that calls 'java -jar MediSnapStarter.jar gdt'
- The steps should be: 1. write GDT File, 2. execute MediSnapStarter, 3. read GDT File
- The file to write should be MEDISNAP.GDT, the file to read from should be EXPORT.GDT
- Assign a keyboard-shortcut or a toolbar-icon to this gdt-connection to easily start MediSnap from within your practice software
3.3 Setup camera control
For this you need to install the camera control drivers from olympus included in the Cameras SDK http://developer.olympus.com/. I think the files needed for connecting to the camera might be allowed to be redistributed here. The sdk files for compilation and development are not. I'll check that later and I'll put online what I'm allowed to. Until then you will need to buy the SDK to connect cameras to MediSnap.When installed, make sure to put your camera in pc-control mode when connected to the pc. This means that your camera will not be connected as external drive but only can be accessed via the sdk. Most cameras bring up a menu when connected via usb where you can choose which way you want to use this time to connect.
Software Components of the MediSnap Client
| /medisnap/bin/MediSnap.jar | This is the main client software module. This is the MediSnap Application that you should start or call when you want to view or make (or compare, or print, or or or) pictures or of your currewnt patient. |
| /medisnap/bin/MediSnap.properties | This is the main client software module configuration file. Here goes all the client configuration like database-server, image-server, camera-types and default localisations. Make sure this file is in the current working directory when launching MediSnap.jar. |
| /medisnap/bin/dbclient.jar | The database client library used to connect to the database server. |
| /medisnap/bin/MediSnapStarter.jar | The starter program to launch MediSnap |
| /medisnap/bin/MediSnap.exe | A simple starter program to launch the Java Runtime Environment with MediSnap.jar (Actually launches MediSnap) |
| /medisnap/bin/MediSnapBackground.exe | The same as MediSnap.exe, just that it tells MediSnap to start into the background and only show the small symbol in the status bar instead popping up as windows. |
| /medisnap/bin/GDTStart.exe | Starts MediSnap telling that there is a patient that we want to view (or create if this patient is yet unknown to MediSnap) throught the GDT Interface. (see MEDISNAP.GDT and EXPORT.GDT) |
| /medisnap/gdt/MEDISNAP.GDT | This file is created by the medical software calling MediSnap over the GDT interface. This file should contain a 6301 dataset with the patients information that allows MediSnap to import or call the appropriate person. |
| /medisnap/gdt/EXPORT.GDT | This file is created by MediSnap after invoked via the GDT interface, telling the calling software what happened (e.g. a photo from localisation 'left arm' was made). This enables the calling software to create a backlink entry into its own interface in the patients data. |
| /medisnap/bin/MediSnapMocha.dll | Used to call the Olympus E-System Camera-SDK via Java. |
| /medisnap/bin/MediSnapRye.dll | Used to call the Olympus Rye Camera-SDK via Java. |